Build a Sci-Fi Aerial Display
On a star base far far away, a dashing hero presses a button on a control panel and a schematic appears in midair. Deftly touching her fingers to the ethereal display, the hero shuts down an energy shield and moves on with her secret mission. If you’ve watched any science fiction, you’re probably familiar with this kind of scenario. But what you may not know is that while star bases and energy shields are still beyond us, floating displays are not.
By this I mean displays that produce two-dimensional images that truly float in empty air and can be interacted with, not displays based on the Pepper’s ghost illusion, where an image is projected onto a transparent surface that has to be kept away from prying fingers. The optical principles to make floating images are well understood, and since the pandemic stoked interest in touch-free controls of all kinds, a number of companies such as Toppan and Kyocera have attempted to commercialize such aerial displays. However, rollouts have been slow, and the intended applications—elevator controls and the like—are not exactly cool.
I decided to build my own aerial display, one that would honor the sci-fi awesomeness of the concept.
I’m no stranger to building offbeat displays. In 2022 I presented in IEEE Spectrum’s Hands On my color electromechanical display, which harked back to the very first days of television. This time, as I was going for something almost from the future, I decided to style my system after the kind of props seen in Star Wars movies. But first, I needed to get the optics working.
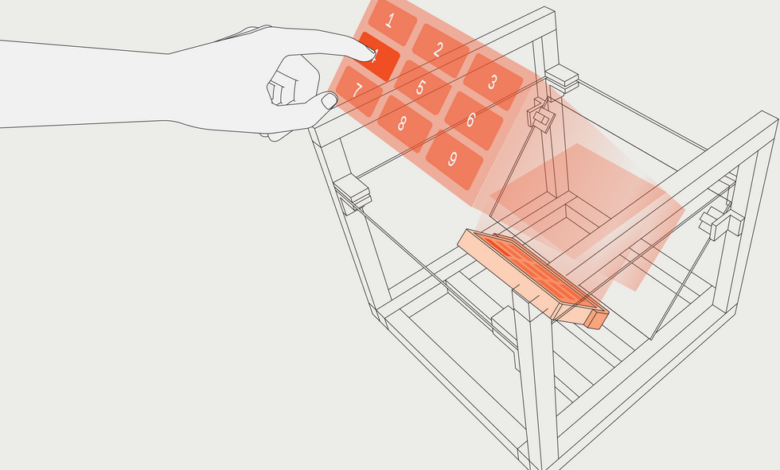
The heart of the aerial display is a bright flat screen [top] powered by a single-board Intel-based computer [bottom left]. Detecting fingertips is the job of an Arduino Nano and three distance sensors [bottom right].James Provost
How Do Aerial Displays Work?
A little optical refresher: Normally, rays from a light source, such as a display, spread out from the source as distance increases. If these diverging rays are, say, reflected by a mirror, the eye perceives the display as being located behind the mirror. This is known as a virtual image. But if you can get the light rays that are emanating from the display to converge at some point in space before spreading out again, the eye perceives the display as if it were located at the point of convergence, even if it’s in midair. This is known as a real image.
The key to making this convergence happen in midair is to use a retroreflective material. Normal reflectors follow the familiar rule that the angle of incidence equals the angle of reflection—that is, a light ray coming into a mirror at a shallow angle from the left will bounce off at the same shallow angle and continue traveling toward the right. But a retroreflector bounces incident light straight back on itself. So, if you mounted a retroreflector directly in front of a screen, all the diverging rays would be reflected back along their own paths, creating a real image as they converge at the surface of the screen. Obviously, this is completely pointless in itself, so we need to introduce another optical element—a semireflector, or beam splitter.
This tech is within reach of most makers today—no hyperdrives required!
This material reflects about half the incident light falling on it and lets the other half pass straight through. And here’s the clever bit: The screen and retroreflector are mounted at 90 degrees to each other, and the semireflector is placed opposite that right angle, putting it at 45 degrees to both the screen and the retroreflector. Now let’s follow the light: The diverging rays emitted from the screen hit the beam splitter, and half are reflected toward the retroreflector, which bounces them back toward the beam splitter. The semireflector allows half of those now-converging rays to pass through. As they finally converge in the air above the display, the rays form a real image.
Clearly, this optical legerdemain is inefficient, with most of the original light being lost to the system. But it wasn’t hard to find a small, modern flat-screen panel bright enough to produce a passable aerial image, at least under indoor (or star-base) lighting conditions. To drive this 7-inch display, I used a LattePanda 3, which is an Intel-based single-board computer capable of running Windows or Linux and supporting multiple displays. (A full bill of materials is available on my project page on hackster.io).
The display creates a image in midair by bouncing the diverging rays from a bright screen off a beam splitter, which reflects half the rays toward a retroreflector. Unlike a mirror, which would make the rays diverge even further, the retroreflector sends converging rays back toward the beam splitter, which lets half of them through to form a real, if dim, floating image.James Provost
Finding the Right Retroreflector
My biggest obstacle was finding a suitable retroreflector material. I eventually settled on a foil that I could cut to the dimensions I desired, produced a sharp image, and wasn’t too expensive. This was Oralite 3010 prismatic photoelectric sheeting, and I was able to buy a 77-centimeter-by-1-meter roll (the shortest available) for about US $90.
The next step was to make the display interactive. After some experimentation, I settled on a $5 laser-based, time-of-flight sensor that reports distance measurements along a narrow cone. I mounted three of these sensors to cover three columns in the plane of the aerial display and connected them to an Arduino Nano via I2C. When a user’s fingertip enters a sensor’s detection cone, the Nano looks to see if the fingertip’s distance from the sensor falls into one of three predefined ranges. With three sensors and three segments per sensor, the aerial display has nine areas that can react to fingers. The area being activated is reported back to the LattePanda via USB.
The optical components and computer were all mounted in a 33 x 25 x 24-centimeter frame made out of aluminum extrusion bars. I also mounted a small touchscreen on the front that lets me control what the LattePanda shows on the aerial display. I added side panels to the frame and attached metallized 3D-printed strips and other adornments that made it look like something that wouldn’t be out of place on the set of a sci-fi show.
The result works beautifully and is as futuristic as I’d hoped, yet also demonstrates that this tech is within reach of most makers today—no hyperdrives required!
IEEE Spectrum